



pod 'ZXTableView'- 将ZXTableView拖入项目中。
#import "ZXTableView.h"- 无需设置数据源和代理,创建一个简单的tableView仅需在控制器中声明cell,headerView(非必须),footerView(非必须)的类,然后将数据数组赋值给
zxDatas,zxDatas为二级数组即为多section的情况,然后在cell中创建model(以“model”字符串结尾),然后重写setModel即可。 - 支持在xib的tableView中设置cell,headerView(非必须),footerView(非必须)的类名,控制器中仅需将数据数组赋值给
zxDatas,后续步骤与上一条相同。 - 超丰富的tableView属性设置,支持根据具体的indexPath设置特定cell,根据具体的section设置特定的headerView和footerView,支持自动高度及自定义高度。
- 支持在cell中直接获取当前indexPath,直接获取当前tableView,支持在model中直接获取当前indexPath,支持在headerView和footerView中获取当前section等。
- 支持tableView的cell点击事件回调,滑动编辑事件回调,滚动事件回调等所有常见代理回调,支持自定义代理。
- 支持自定义系统tableView的所有代理和数据源设置(一般不需要)。
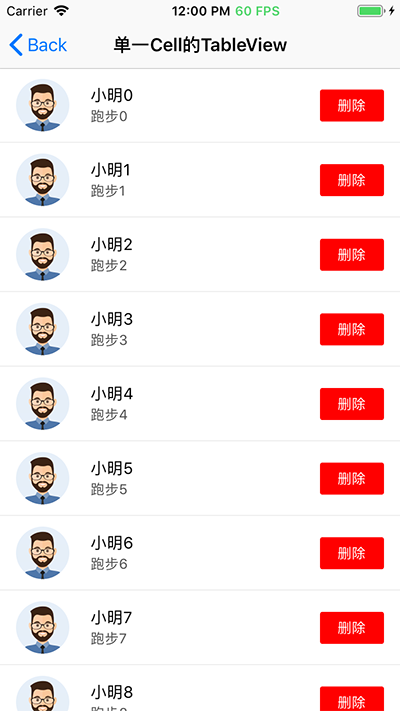
- 在TableView所在的控制器中,此处定义的cell对应模型为ZXTestSingleTbModel
//声明cell是什么类
self.tableView.zx_setCellClassAtIndexPath = ^Class (NSIndexPath *  indexPath) {
    return [ZXTestSingleTbCell class];
};
//获取cell对象并对其进行处理
__weak __typeof(self) weakSelf = self;
self.tableView.zx_getCellAtIndexPath = ^(NSIndexPath *indexPath, ZXTestSingleTbCell *cell, id model) {
    cell.delBlock = ^{
        [weakSelf.tableView.zxDatas removeObjectAtIndex:indexPath.row];
        [weakSelf.tableView reloadData];
    };
};
//设置ZXTableView的数据,dataArr即为ZXTestSingleTbModel模型数组,如果需要多个section的效果,只需要改变dataArr即可。
self.tableView.zxDatas = dataArr;- 在ZXTestSingleTbCell中
#import "ZXTestSingleTbCell.h"
#import "ZXTestSingleTbModel.h"
@interface ZXTestSingleTbCell()
@property (weak, nonatomic) IBOutlet UIImageView *iconImgV;
@property (weak, nonatomic) IBOutlet UILabel *nameLabel;
@property (weak, nonatomic) IBOutlet UILabel *goodAtLabel;
@property (weak, nonatomic) IBOutlet UIButton *delBtn;
//若cell中有包含model的属性,则会自动将model赋值给它(如果有多个含有model字符串的属性,则赋值给第一个)
@property (strong,nonatomic) ZXTestSingleTbModel *sTbModel;
@end

//重写model的set方法即可
-(void)setSTbModel:(ZXTestSingleTbModel *)sTbModel{
    _sTbModel = sTbModel;
    self.iconImgV.image = sTbModel.iconImg;
    self.nameLabel.text = sTbModel.name;
    self.goodAtLabel.text = sTbModel.goodAt;
}- 查看效果
- 在TableView所在的控制器中,此处定义的cell对应模型为ZXTestSingleTbModel
//声明cell是什么类
self.tableView.zx_setCellClassAtIndexPath = ^Class (NSIndexPath *  indexPath) {
    return [ZXTestSingleTbCell class];
};
//声明HeaderView是什么类
self.tableView.zx_setHeaderClassInSection = ^Class(NSInteger section) {
    return [ZXTestHFHeaderView class];
};
//声明FooterView是什么类
self.tableView.zx_setFooterClassInSection = ^Class(NSInteger section) {
    return [ZXTestHFFooterView class];
};
//获取HeaderView对象并对其进行处理
self.tableView.zx_getHeaderViewInSection = ^(NSUInteger section, ZXTestHFHeaderView *headerView, NSMutableArray *secArr) {
    headerView.headerLabel.text = [NSString stringWithFormat:@"HeaderView--%lu",section];
};
//获取FooterView对象并对其进行处理
self.tableView.zx_getFooterViewInSection = ^(NSUInteger section, ZXTestHFFooterView *footerView, NSMutableArray *secArr) {
    footerView.footerLabel.text = [NSString stringWithFormat:@"FooterView--%lu",section];
};
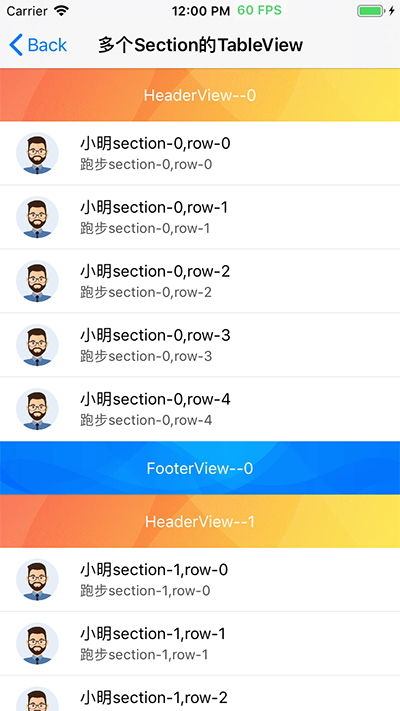
//设置ZXTableView的数据,dataArr即为ZXTestSingleTbModel模型数组,dataArr中包含多个数组。
self.tableView.zxDatas = dataArr;- 在ZXTestSingleTbCell中的处理同上
- 查看效果
- 在TableView所在的控制器中,此处定义的cell对应模型为ZXTestCHTbModel
#pragma mark 设置TableView
//声明cell是什么类
self.tableView.zx_setCellClassAtIndexPath = ^Class (NSIndexPath *  indexPath) {
    return [ZXTestCHTbCell class];
};
//声明HeaderView是什么类
self.tableView.zx_setHeaderClassInSection = ^Class(NSInteger section) {
    return [ZXTestCHTbSpaceHeader class];
};
//设置ZXTableView的数据,dataArr即为ZXTestCHTbModel模型数组
self.tableView.zxDatas = dataArr;-
ZXTestCHTbCelll中的处理同上
-
在ZXTestCHTbModel.h中
@interface ZXTestCHTbModel : NSObject
@property (strong,nonatomic) UIImage *iconImg;
@property (copy,nonatomic) NSString *name;
@property (copy,nonatomic) NSString *time;
@property (copy,nonatomic) NSString *comment;
//此处声明了cellH,则ZXTableView会自动把cell高度赋值给cellH,更改cellH即可改变cell高度
@property (assign,nonatomic) CGFloat cellH;
@end- 在ZXTestCHTbModel.m中
#import "ZXTestCHTbModel.h"

@implementation ZXTestCHTbModel
-(void)setComment:(NSString *)comment{
    _comment = comment;
    //此处comment所显示对应的Label距离左右边距离为15,字体大小为14,cell顶部显示个人信息的View高度为50,commentLabel距离上下均为10
    CGFloat commentH = [self getStrHeightWithText:comment font:[UIFont systemFontOfSize:14] viewWidth:[UIScreen mainScreen].bounds.size.width - 15 * 2];
    //将计算的cell高度赋值给cellH即可
    self.cellH = commentH + 10 * 2 + 50;

}
//获取文字高度
- (CGFloat)getStrHeightWithText:(NSString *)text font:(UIFont *)font viewWidth:(CGFloat)width {
    NSDictionary *attrs = @{NSFontAttributeName :font};
    CGSize maxSize = CGSizeMake(width, MAXFLOAT);
    NSStringDrawingOptions options = NSStringDrawingUsesLineFragmentOrigin | NSStringDrawingUsesFontLeading;
    CGSize size = [text boundingRectWithSize:maxSize options:options attributes:attrs context:nil].size;
    return  ceilf(size.height);
}
@end- 查看效果

- 创建ZXCustomTableView继承于ZXTableView
- 在ZXCustomTableView.m中重写zx_setTableView和zx_setCell:方法即可
@implementation ZXCustomTableView
//重写父类zx_setTableView,统一设置tableView样式和偏好
- (void)zx_setTableView{
    self.backgroundColor = [UIColor redColor];
    self.zx_autoDeselectWhenSelected = NO;
}
//重写父类zx_setTableView,统一设置cell样式和偏好
- (void)zx_setCell:(UITableViewCell *)cell{
    cell.backgroundColor = [UIColor greenColor];
}
@end- 创建一个tableView的步骤大致分为,声明cell,声明headerView&footerView,self.tableView.zxDatas赋值,在cell中声明一个含有“model”的属性名,重写该属性的set方法即可。
- ZXTableView中的大多数方法都是zx_开头,zx_set开头代表设置tableView,例如:zx_setCellClass...即为设置(声明)cell的类是谁;zx_get开头代表从tableView中获取信息,例如zx_getCellAt...即为获取cell对象,可依据此结合下方说明快速记忆。
- 使用代码方式声明
self.tableView.zx_setCellClassAtIndexPath = ^Class (NSIndexPath *  indexPath) {
    //可以根据indexPath返回不同的cell
    return [MyCell class];
};- 或在xib中设置
ZXTableView的zx_cellClassName
self.tableView.zx_getCellAtIndexPath = ^(NSIndexPath *indexPath, id cell, id model) {
    //这里的id cell中id可以改成自己当前的cell类名(若只有一种cell),id model中的id可以改成自己当前模型的类名(若只有一种模型)
}[self.tableView zx_setCellClassAtIndexPath:^Class(NSIndexPath *indexPath) {
return [MyCell class];
} returnCell:^(NSIndexPath *indexPath, id cell, id model) {
//获取cell对象
}];//返回cell高度,ZXTableView默认会将cell高度设置为cell本身高度,也就是xib中cell的高度或纯代码中在初始化方法中设置的cell的高度,若需要改动,则可以使用以下方法实现。
self.tableView.zx_setCellHAtIndexPath = ^CGFloat(NSIndexPath *indexPath) {
    return 70;
};self.tableView.zx_editActionsForRowAtIndexPath = ^NSArray<UITableViewRowAction *> *(NSIndexPath *indexPath) {
UITableViewRowAction *delAction = [UITableViewRowAction rowActionWithStyle:UITableViewRowActionStyleDestructive title:@"删除" handler:^(UITableViewRowAction * _Nonnull action, NSIndexPath * _Nonnull indexPath) {
[weakSelf.tableView.zxDatas removeObjectAtIndex:indexPath.row];
[weakSelf.tableView reloadData];
}];
//第0行不显示侧滑删除,其余行显示侧滑删除,这里只是为了演示控制侧滑删除行的情况
if(indexPath.row == 0){
return nil;
}
return @[delAction];
};- 在控制器中设置cell高度,可根据indexPath设置不同的cell高度(优先级最高,若设置了,其他高度设置方法均无效)
self.tableView.zx_setCellHAtIndexPath = ^CGFloat(NSIndexPath *indexPath) {
return 70;
};- 在cell中设置cell的高度(优先级最低)
//在cell的初始化方法中设置cell高度即可
self.height = 50;- 在model中设置cell的高度(优先级第二,若设置,则在cell中设置cell的高度无效)
在model.h中
//此处声明了cellH,则ZXTableView会自动把cell高度赋值给cellH,更改cellH即可改变cell高度
@property (assign,nonatomic) CGFloat cellH;
在model.m中,在需要的时候更改cellH
//例如,可以重写cellH的set方法,将cell高度在原先基础上增加10
-(void)setCellH:(CGFloat)cellH{
    _cellH = cellH + 10;
}- 在cell中获取当前的indexPath
//在Cell.h或Cell.m中定义属性indexPath,然后通过self.indexPath获取
@property (strong, nonatomic) NSIndexPath *indexPath;
或
//在cell中直接通过self.zx_indexPathInTableView直接获取(需要'#import "ZXTableView.h"')
 NSIndexPath *indexPath = self.zx_indexPathInTableView;
如果需要根据indexPath给cell赋值,建议重写zx_indexPathInTableView的set方法并在set方法中进行赋值,例子可参见下方headerView的示例
- 在model中获取当前的indexPath
//在Model.h或Model.m中定义属性indexPath,然后通过self.indexPath获取
@property (strong, nonatomic) NSIndexPath *indexPath;
或
//在model中直接通过self.zx_indexPathInTableView直接获取(需要'#import "ZXTableView.h"')
NSIndexPath *indexPath = self.zx_indexPathInTableView;- 使用代码声明
//声明HeaderView是什么类
self.tableView.zx_setHeaderClassInSection = ^Class(NSInteger section) {
    return [MyHeaderView class];
};- 或在xib中设置
ZXTableView的zx_headerClassName
//获取HeaderView对象并对其进行处理
self.tableView.zx_getHeaderViewInSection = ^(NSUInteger section, MyHeaderView *headerView, NSMutableArray *secArr) {
    headerView.headerLabel.text = [NSString stringWithFormat:@"HeaderView--%lu",section];
};[self.tableView zx_setHeaderClassInSection:^Class(NSInteger) {
return [MyHeaderView cell];
} returnHeader:^(NSUInteger section, id headerView, NSMutableArray *secArr) {
//获取headerView对象
}];//返回headerViewl高度,ZXTableView默认会将headerView高度设置为headerView本身高度,也就是xib中headerView的高度或纯代码中在初始化方法中设置的headerView的高度,若需要改动,则可以使用以下方法实现。
self.tableView.zx_setHeaderHInSection = ^CGFloat(NSInteger section) {
    return 100;
};- 在控制器中设置headerView高度
self.tableView.zx_setHeaderHInSection = ^CGFloat(NSInteger section) {
return 100;
};- 在headerView中设置headerView高度
//在headerView的初始化方法中设置headerView高度即可
self.height = 100;- 在headerView中获取当前的section
//在headerView.h或headerView.m中定义属性section即可
@property (strong, nonatomic) NSNumber *section;
或
//在headerView中直接通过self.zx_sectionInTableView直接获取(需要'#import "ZXTableView.h"')
NSUInteger section = self.zx_sectionInTableView;
如果需要根据section给headerView赋值,建议重写zx_sectionInTableView的set方法并在set方法中进行赋值,如
#import "ZXTestHFHeaderView.h"
@implementation ZXTestHFHeaderView
- (void)setZx_sectionInTableView:(NSUInteger)zx_sectionInTableView{
    self.headerLabel.text = [NSString stringWithFormat:@"HeaderView--%lu",zx_sectionInTableView];;
}
@end- 无数据是否显示HeaderView,默认为YES
//无数据时不显示headerView
self.tableView.zx_showHeaderWhenNoMsg = NO;- 保持headerView不变(仅初始化一次),默认为NO
//保持headerView只初始化一次,之后不再重新创建
self.tableView.zx_keepStaticHeaderView = YES;- 点击了某一行cell
//点击了某一行cell
self.tableView.zx_didSelectedAtIndexPath = ^(NSIndexPath *indexPath, id model, id cell) {
  //这里的id cell中id可以改成自己当前的cell类名(若只有一种cell),id model中的id可以改成自己当前模型的类名(若只有一种模型)

};- 取消点击某一行cell
//取消点击某一行cell
self.tableView.zx_didDeSelectedAtIndexPath = ^(NSIndexPath *indexPath, id model, id cell) {
  //这里的id cell中id可以改成自己当前的cell类名(若只有一种cell),id model中的id可以改成自己当前模型的类名(若只有一种模型)

};- 禁止系统Cell自动高度 可以有效解决tableView跳动问题,默认为YES
self.tableView.zx_disableAutomaticDimension = YES;- 无数据是否显示HeaderView,默认为YES
self.tableView.zx_showHeaderWhenNoMsg = YES;- 无数据是否显示FooterView,默认为YES
self.tableView.zx_showFooterWhenNoMsg = YES;- 控制获取cell回调在获取model之后,默认为NO
self.tableView.zx_fixCellBlockAfterAutoSetModel = YES;- 当选中cell的时候是否自动调用tableView的deselectRowAtIndexPath,默认为YES
self.tableView.zx_autoDeselectWhenSelected = NO;- 是否将所有cell的SelectionStyle设置为None,默认为NO
self.tableView.zx_makeAllCellSelectionStyleNone = YES;///scrollView滚动事件
@property (nonatomic, copy) void (^zx_scrollViewDidScroll)(UIScrollView *scrollView);
///scrollView缩放事件
@property (nonatomic, copy) void (^zx_scrollViewDidZoom)(UIScrollView *scrollView);
///scrollView滚动到顶部事件
@property (nonatomic, copy) void (^zx_scrollViewDidScrollToTop)(UIScrollView *scrollView);
///scrollView开始拖拽事件
@property (nonatomic, copy) void (^zx_scrollViewWillBeginDragging)(UIScrollView *scrollView);
///scrollView开始拖拽事件
@property (nonatomic, copy) void (^zx_scrollViewDidEndDragging)(UIScrollView *scrollView, BOOL willDecelerate);//tableView的DataSource 设置为当前控制器即可重写对应数据源方法
@property (nonatomic, weak, nullable) id <UITableViewDataSource> zxDataSource;
//tableView的Delegate 设置为当前控制器即可重写对应代理方法
@property (nonatomic, weak, nullable) id <UITableViewDelegate> zxDelegate;- 获取cell所在的tableView
//在cell中
UITableView *tableView = self.zx_tableView;- 获取cell所在的控制器
//在cell中
UIViewController *vc = self.zx_vc;- 获取cell所在的导航控制器
//在cell中
UINavigationController *nav = self.zx_navVc;- 获取cell所在的ZXTableView的zxDatas可变数组
//在cell中
NSMutableArray *datas = self.zx_tableViewDatas;- 同cell
- 自动跳转仅限于点击任何cell都跳转同一控制器的情况
- 点击任何cell都跳转到TestVC,此处"vc"key大小写均可以,value则为需要跳转的控制器名
//在控制器中
self.tableView.zx_autoPushConfigDictionary = @{@"vc":@"TestVC"};- 点击任何cell都跳转到TestVC,且将点击处的indexPath.row赋值给TestVC的myId属性
//在控制器中
self.tableView.zx_autoPushConfigDictionary = @{@"vc":@"TestVC",@"myId":@"indexPath.row"};- 点击任何cell都跳转到TestVC,且将点击处的model.name赋值给TestVC的myName属性
//在控制器中
self.tableView.zx_autoPushConfigDictionary = @{@"vc":@"TestVC",@"myName":@"model.name"};- 点击任何cell都跳转到TestVC,且将局部变量testValue赋值给TestVC的myTestValue属性
//在控制器中
self.tableView.zx_autoPushConfigDictionary = @{@"vc":@"TestVC",@"myTestValue":testValue};- 通过自动跳转的配置您可以无需实现didSelect方法即可实现点击cell控制器自动跳转且自动赋值